[ad_1]
The 3D games we play and love are all made up of thousands, if not millions, of colored straight lines and other edges. And because of the way that these appear on your screen, they can often look jagged and distracting. In the fifth part of our deep look at 3D game rendering, we’ll explain what methods are used to smooth out the edges of the worlds we play in. Not as much math this time, though, so that’s a bit of good news!
Since we’re just going to dive right in to see how this all works, you might want to check out our 3D Game Rendering 101, if you’re new to the whole shebang. After that, you can catch up with the more complex elements of rendering in the articles below.
The Making of Graphics Explained
Part 1: 3D Game Rendering: Vertex Processing
A Deeper Dive Into the World of 3D Graphics
Part 2: 3D Game Rendering: Rasterization and Ray Tracing
From 3D to Flat 2D, POV and Lighting
Part 3: 3D Game Rendering: Texturing
Bilinear, Trilinear, Anisotropic Filtering, Bump Mapping, More
Part 4: 3D Game Rendering: Lighting and Shadows
The Math of Lighting, SSR, Ambient Occlusion, Shadow Mapping
Part 5: 3D Game Rendering: Anti-Aliasing
SSAA, MSAA, FXAA, TAA, and Others
Playing the blame game
Mathematically, aliasing is caused where a continuous ‘signal’ is transformed into a discrete set of values, via sampling. Rasterizing a straight or curved line induces spatial aliasing — these geometric shapes effectively consist of an infinite number of points between two locations in space, and representing it using a fixed number of pixels will always result in an approximation of that line, no matter how pixels are used.
Since the pixelated version of the line is no longer an actual line, moving it about or putting it next to other shapes creates a myriad of visual oddities, which is what we’re referring to with the term “aliasing.”
You might wonder whether this process is actually necessary but it’s born out of the fact that the rendered image needs to be displayed on a screen. No matter whether it’s made from a cathode ray tube (CRT), liquid crystal display (LCD), or plasma panel, that screen creates the picture by using an array of colored elements.

Some signals change over time, rather than space and you get aliasing here, too, when sampling at set intervals. For example, converting an analogue audio track to a digital one involves measuring the sound level every few fractions of a second (in the case of, say, CD audio it’s every 0.02 milliseconds).
The differences between the signal constructed from the sample and the original one creates temporal aliasing and is generally tackled by sampling at faster rates. But what if the signal is actually a sequence of motion? If we observe the real world, things around us seem to move in a continuous manner, so when we convert this into a stream of snapshots of this motion, we get aliasing.
In the world of movies, this results in odd looking motion, such as the wheels of a car appearing to rotate in the opposite direction to the vehicle’s heading. It also appears in 3D graphics, when the rendering frame rate of the scene isn’t high enough to fully represent the movement of objects and characters, leading to edges looking blurred or jagged, the latter of which is further exacerbated by spatial aliasing.
While the techniques employed to counter these problems are collectively known as anti-aliasing (AA, for short), what gets used for films is totally different for a 3D game. In fact for the latter, there’s a wealth of methods used and go by all kinds of different names. But before we go through the general premise of the most commonly used algorithms, let’s consider frame resolution and frame rate.
Why? Well, if they were both extremely high, then surely aliasing wouldn’t be an issue. If we use an old benchmark, such as UL’s 3DMark03, and run it on a modern system, then we can concentrate solely on spatial aliasing.

The above image, from the first Wings of Fury test, was taken at a resolution of 1280 x 720 pixels. Fourteen years ago, when ATI’s Radeon 9800 XT and Nvidia’s GeForce FX 5900 Ultra were the best graphics cards available, the biggest monitors at the time topped out at around 1600 x 1200 — so what we’re using here would have been considered to be a medium-to-low resolution (akin to 1080p today).

But a quick glance at the wings of the planes clearly highlights the issue of aliasing, and it’s especially noticeable in motion. The large contrast between the color of the pixels making up the wing and the background sky and clouds creates shimmering, as the plane moves through the sky.
The relatively low sampling rate of the raster is to blame here, so the most obvious solution would be to increase it; let’s see the same scene again at 4K (3840 x 2160 pixels).

The edges of the wings are now noticeably smoother, but if you zoom in a little bit, aliasing is still present. We could continue to increase the resolution further, to the point where we visually couldn’t see any aliasing, but there’s a cost to doing this.
Unless otherwise coded, every pixel in the raster needs to be processed: multiple textures applied and numerous shaders crunched through to calculate the final color. This is typically the bottleneck in most games, running on the majority of computer systems out there, so the overall frame rate will inversely scale with the raster resolution.
For something as old as 3DMark03 on a modern PC, going from 768p to 4K only dropped the average frame rate from 1670 to 1274 FPS
For something as old as 3DMark03 on a modern PC, going from 1280 x 768 to 3840 x 2160 only dropped the average frame rate from 1670 to 1274 FPS — i.e. a 740% increase in the number of pixels to process resulted in a 24% decrease in performance. This wouldn’t be the case in something more recent, though.
This can be easily demonstrated by running UL’s current 3DMark across a number of resolutions; the graph below shows the average frame rate of the first graphics test in the Time Spy benchmark.

The jump from 720p to 4K is an 800% increase in resolution, but the frame rate dropped by 81%. While games may not show a pattern exactly like this, a modern AAA title won’t be too different. What it’s telling us is that if we want to reduce the impact of aliasing as much as possible, then we need a better method than just upping the raster resolution — the lower the frame rate, the worse temporal aliasing becomes.
Unfortunately, the first algorithm developed to combat spatial aliasing did exactly this, but before we move on to have a look at this, it’s worth pointing out a few caveats with what we’ll cover in this article. Over the years, anti-aliasing techniques have been developed by independent academic researchers, as well as system developers at companies such as ATi, Intel, and Nvidia.
With no central body defining terminology, there’s significant variation in what one vendor or game programmer might use compared to another, even though their methods all have the same name. So we’ll be using the most general form of the algorithm’s names and also explain how the fundamental technique works — for each one, there are numerous tweaked and expanded versions, each with its own initialized title.
Supersampling anti-aliasing (SSAA)
Often called full scene anti-aliasing, this method is the oldest and simplest of all. It involves rendering the scene at a higher resolution than the target setting, then sampling and blending this result back down to a lower number of pixels. For example, the monitor might be limited to 1920 x 1080 pixels, but the game could be made to render at 3840 x 2160, before being scaled back down and sending the result to the screen.
The sampling pattern employed is typically nearest neighbour (essentially a box around the pixel) and the blending math being nothing more than the arithmetic mean of the samples.
Surely, the capabilities of modern GPUs permit more complex sampling and blending algorithms to be used. But let’s have a quick look at how it works — the image below is showing the application of classic 4x SSAA in action. The 4x refers to the fact that 4 samples (also called taps) are blended together, by calculating the arithmetic mean of the color values, for the final output. To do this, the raster resolution is increased by a factor of 2 along both axes.

Note how the sample locations in this example are the pixels’ dead centers? Since the pixels themselves have a discrete area, the positions of the samples can be set to anywhere within that region. Many years ago, both AMD and Nvidia experimented with all kinds of sample patterns, to get the best possible anti-aliasing.
The pattern and blending method described above is known as a box filter, though a common enhancement involves using a rotated grid for the sample locations (aka RGSS). The problem with SSAA is all those extra pixels need to be processed and as we saw in the 3DMark tests, increasing the raster resolution can easily cause the frame rate to nose dive.
For the most part, supersampling has been superseded (pun absolutely intended) by more efficient algorithms, but it’s found new light as a setting in the drivers for graphics cards made by AMD and Nvidia. The former calls theirs Virtual Super Resolution (VSR), whereas the latter uses the vastly different title of Dynamic Super Resolution (DSR).
These can be used to enable anti-aliasing in some old games that didn’t have any system built into them, or just improve what’s already there.
Multisample anti-aliasing (MSAA)
This method first appeared from the research labs of Silicon Graphics in the early 90s and it’s essentially SSAA, but applied only to where it’s actually needed. Okay, so there’s obviously a lot more to it that that, but it should help you figure out how the algorithm essentially operates.
Supersampling’s main advantage is also a bit of a problem, as everything is getting anti-aliased: edges of primitives, flat texture surfaces, transparent polygons, the lot. Given that texture filtering already takes care of what’s going on inside rendering triangles, what we need is a system that only gets applied to edges, as these generate the most visible problem of aliasing.
But how to do that? Well it just so happens that the information required to do this is already there. When the 3D world of the vertex is converted into the 2D plane of the raster, the pixels that make form all of the different primitives in the scene contain not just information about color and textures, but also depth.

This information can be stored in z-buffer (sometimes called a depth buffer) and then used to determine edge visibility. In the above example, a simple primitive lies face on to the camera, and so the depth values at the respective pixel centers is a simple one: white is background, black is the primitive.
Now since GPUs have the ability to take additional samples within a pixel, we can create a higher resolution version of the blocky black and white grid. Once again, we simply record the depth of the primitive at the sample locations, and the end result would look something like this.

See how the multiple samples (ah, so that’s how it gets its name) has given us a depth map of the primitive that’s more representative of what’s actually there? Now comes the clever part. Keeping this detailed depth map to one side, we go back to our original resolution frame, and run all our various pixel shaders to get the final color.
We then return to the detailed depth buffer and for every pixel that’s in the primitive (i.e. the black ones), we allocate the shader output color to it. This obviously needs to be stored somewhere, so that’s another high resolution buffer that needs to be generated — either that or we have a separate but relatively small buffer each sample point in the pixel.
Then, just like in SSAA, we sample and blend the detailed buffer back down to the required resolution and voila! You’ve got an anti-aliased frame. In terms of performance, we’ve only run pixel shaders on a relatively low number of points, but we’ve also had to create and store a couple of high resolution buffers to do this.
So multisample anti-aliasing, as it’s called, needs plenty of VRAM and memory bandwidth (plus the ability to read/write to z-buffers quickly), but it doesn’t require lots of raw shader power. Let’s use an old AMD coding example to see how it looks and compares to SSAA.

The code runs a simple scene, with basic textures and lighting, but plenty of geometry so that aliasing on the edges stands out a lot more. In the top left corner, there’s some interesting snippets of information — each frame is taking 0.18 milliseconds on average to render, and just 0.02 ms to blend it for the final output. The color buffer (the one that we’re looking at) is 7.4 MB in size and the depth buffer is the same (the small b is a typo).
We can also zoom into specific areas of the frame to see the aliasing in all its gory detail. Now don’t forget that we could have rendered all of this at a higher resolution, but that will just increase the render times. But if we apply 4x SSAA to the scene, this is exactly what happens.

In the image above, note that the render time has gone up to 0.4 ms (an increase of 122%) and the blend time, listed as ‘Resolve’ has doubled in length. Also, the size of the color and depth buffers has gone up by a factor of 4. This is the cost of using SSAA, and while none of this is difficult for a modern GPU to do in an example like this, it would be awful in one of the latest 3D titles.
But take a look at the zoomed-in part. Notice how much smoother the lines are? Yes, there’s still plenty of aliasing present but it’s markedly better. If only it wasn’t so expensive to do! Well that’s where we switch to using MSAA instead — a few clicks and here we go.

The scene render time is right back down to almost where it was with no anti-aliasing applied, which is good, although the resolve time has increased further. The total memory footprint is also half way between no AA and 4xSSAA, so it would seem that MSAA is definitely the way to go.
Even the reduction in aliasing on the primitive edges appears better, although this is more to do with the sampling pattern used, rather than the nature of MSAA itself. In fact, if one looks at the texture of the wall in the zoomed area, one drawback of multisample AA becomes evident.
Where SSAA improves everything, MSAA only affects the edges of polygons and although this isn’t a big problem in static images, motion tends to make the difference between smoothed lines and blurred textures a little more noticeable. Another issue is that the algorithm doesn’t play nicely with deferred rendering and while there are ways around this, none of them are ‘free’, in terms of performance.
So what can you do if super- and multisampling anti-aliasing methods aren’t great choices?
Fast approximate anti-aliasing (FXAA)
In 2009, Nvidia presented a different method entirely for tidying up the jagged edges of shapes in a 3D scene. Where SSAA relied on sheer brute force and MSAA on hardware features and a few coding tricks, FXAA was designed to be done entirely via shaders. It’s been refined a few times since its release and is heavily used in games today.
The code is run as a post-processing pass (i.e. after the majority of the other rendering has been completed but before elements such as the HUD are applied), typically in the form of a single pixel shader. The original iteration of the algorithm worked like this: first sample the buffer containing the image for displaying and converts the sRGB value into a linear estimate of the luminance of that pixel (this is a measure of how much light is passing through a given area in a set direction).
This part of the shader is barely a few lines and can even just use the green channel to estimate calculate the light level. Why does it need this? Well, the next step in the shader involves checking the relative contrast of the surrounding pixels to the sampled one — if there’s a big difference, then that location is most likely to be on the edge.

For those pixels that pass this test, they go through a further check to determine the orientation of the edge. After this has been figured out, the pair of pixels (at 90° to the edge) that has the highest difference in luminance is used to scan along the edge, to search for its ends. This is indicated when there’s a big enough change in the average luminance of this pixel pair.
Once all of the edges have been fully identified, all of the positions of the pixels along those edges are shifted: up or down, in the case of horizontal edges, and side-to-side for vertical ones. They’re only moved by a tiny amount, so small that the new position is within the area of the original pixel. With everything subtly nudged about, the original frame buffer is sampled using the new locations — pixels inside primitives will still be where they were before, but those defining an edge will be altered, all helping to reduce the impact of aliasing.
FXAA has some serious advantages over SSAA and MSAA. First of all, it’s such a simple piece of code that pretty much any GPU can do it; even low-end budget models can churn out the routine in just a few milliseconds.
Secondly, it anti-aliases all edges, not just the perimeters of shapes. For example, textures with transparency (often used for smoke, debris, and foliage) will get smoothed out, which is something that MSAA won’t do.

The downsides? If the frame is full of high contrast areas, such as bright pixels on a dark background, they’ll get blended whether they’re supposed to or not.
The accuracy of the method isn’t as good as that in SSAA nor MSAA, due to not catching sub-pixel details — it’s essentially just a fancy filter and can result in some mushy looking textures. But when it’s so cheap to employ and produces reasonably effective results, you can see why FXAA is still being used 12 years on — albeit thoroughly revised.
There are other full screen edge-finding algorithms, similar to Nvidia’s. Morphological anti-aliasing (MLAA), developed by Intel, was the inspiration for FXAA; it was further refined by game developer Crytek and the University of Zaragoza in Spain, and went under the name of Enhanced Sub-pixel MLAA (SMAA, for short).
The best aspect about all of these is that unlike SSAA and MSAA, these can be constantly updated and modified by programmers, tweaking them to best fit the applications or games they’re making.
Temporal anti-aliasing (TAA)
So far, we’ve only looked at methods to combat the visual impact of spatial aliasing. To counter temporal aliasing, induced in games by the fact that 3D games generate discrete samples of continuous motion, the following algorithm is the mostly commonly used.
We begin by rendering a frame and displaying it as we would do normally; however, we also store the color values of the pixels in a chunk of memory called a history buffer. The renderer then turns to the next frame in the sequence and processes that one, but before displaying this one, the history buffer is sampled and the result is blended with the current frame. The history buffer then gets updated with this result, copied to produce the final image, and our finished buffer is then flagged ready for showing on the monitor.

All subsequent frames then follow this pattern of render, sample the history buffer, blend, updated, and display. The accumulation of consecutive frames results in a smoothing of the entire scene, as it goes from frame to frame, and hey presto! We’ve got an anti-aliased picture to look at.
If that’s all it did, though, then the algorithm would be fairly useless — for example, if there were no changes between the frames, then the blending wouldn’t fix anything. So to work around this, each frame is initially rendered with the camera randomly offset, by a tiny margin (called a sub-pixel jitter). The mildly shifted positions of the pixel locations are then used to sample the history buffer, and the jitter is then removed to finish processing the frame.
Thus when it comes to blending the history values with the current ones, you nearly always get sampled sub-pixel locations that aren’t quite in the same place, giving rise to a degree of anti-aliasing.

Temporal AA can also generate excessive blurring, though, as well as an issue called ghosting, where the edges of moving objects appear to be smeared, rather than softened.
One common method used to get around this involves using a compute shader to calculate the motion vectors of objects, store the information in memory (a velocity buffer) and then compare the relative velocities of the current pixel against those sampled — if they’re noticeably different, then the history sample is rejected.
In addition to using velocity values, most TAA implementations carry out a further verification process on the history samples — this prevents values from previous frames being used that are no longer relevant in the current frame (they could be hidden behind a moved object, for example). This method typically uses an axis-aligned bounding box, where the axes map out the chromaticity of the history buffer, rejecting any that have a color outside of these limits.
The final blend of history and current pixels can also be weighted, using comparative values of color, luminance, or velocity; lastly, during the final copy of the updated history buffer for displaying, a variety of blur filters can be utilized to further reduce ghosting.

For developers, coding all of this is significantly more involved than adding an SSAA or MSAA option to a game. But modern GPUs can crunch through all the required shaders pretty quickly and where super- and multisampling algorithms take lots of samples for each frame (requiring a good deal of ROP work and memory bandwidth), TAA effectively spreads out these samples over multiple frames. This means that for games that aren’t massively limited by the amount of shading going on, TAA can be enabled with a relatively small loss in performance.
TAA also works well with deferred rendering and can be used alongside the likes of FXAA and SMAA, resulting in even better visuals. It is, unfortunately, somewhat prone to being overly blurry and give rise to shimmering artifacts along high contrast edges. However, as the compute ability of GPUs show no sign of reaching a plateau just yet, the techniques can be further refined by using more complex methods to determine how to sample and verify the history buffer.
And there’s more!
The four methods described above are heavily used in games for PCs and consoles, especially the likes of FXAA and TAA. But there are plenty more out there.
For example, when Nvidia launched the GeForce 9 series graphics cards, they also announced a modified version of MSAA, called Multi-Frame Sampled Anti-aliasing (MFAA). Essentially, the GPU modifies the sampling pattern with each successive frame, so that per frame a lower number of samples are taken and blended.
Averaged out of multiple frames and the effect is the same as what you’d get with normal MSAA, but at a lower performance cost. Unfortunately, this algorithm could only be implemented via games that had been developed under Nvidia’s guidance, and wasn’t rolled out across every title. It’s still around, though, and you can access it by enabling an option in the GeForce driver control panel.
More recently, the GPU giant has invested considerable resources into developing an AA algorithm that utilizes AI — called Deep Learning Super Sampling (DLSS), which first appeared in 2018 with their Turing chips.
The original version of DLSS required Nvidia to train the deep neural network (DNN) on specific games, comparing low resolution frames against very high resolution ones, that had SSAA enabled. The current version uses a more generalized network and takes in additional information, in the form of motion vectors, to determine what the frame should look like, if it was rendered at a higher resolution.
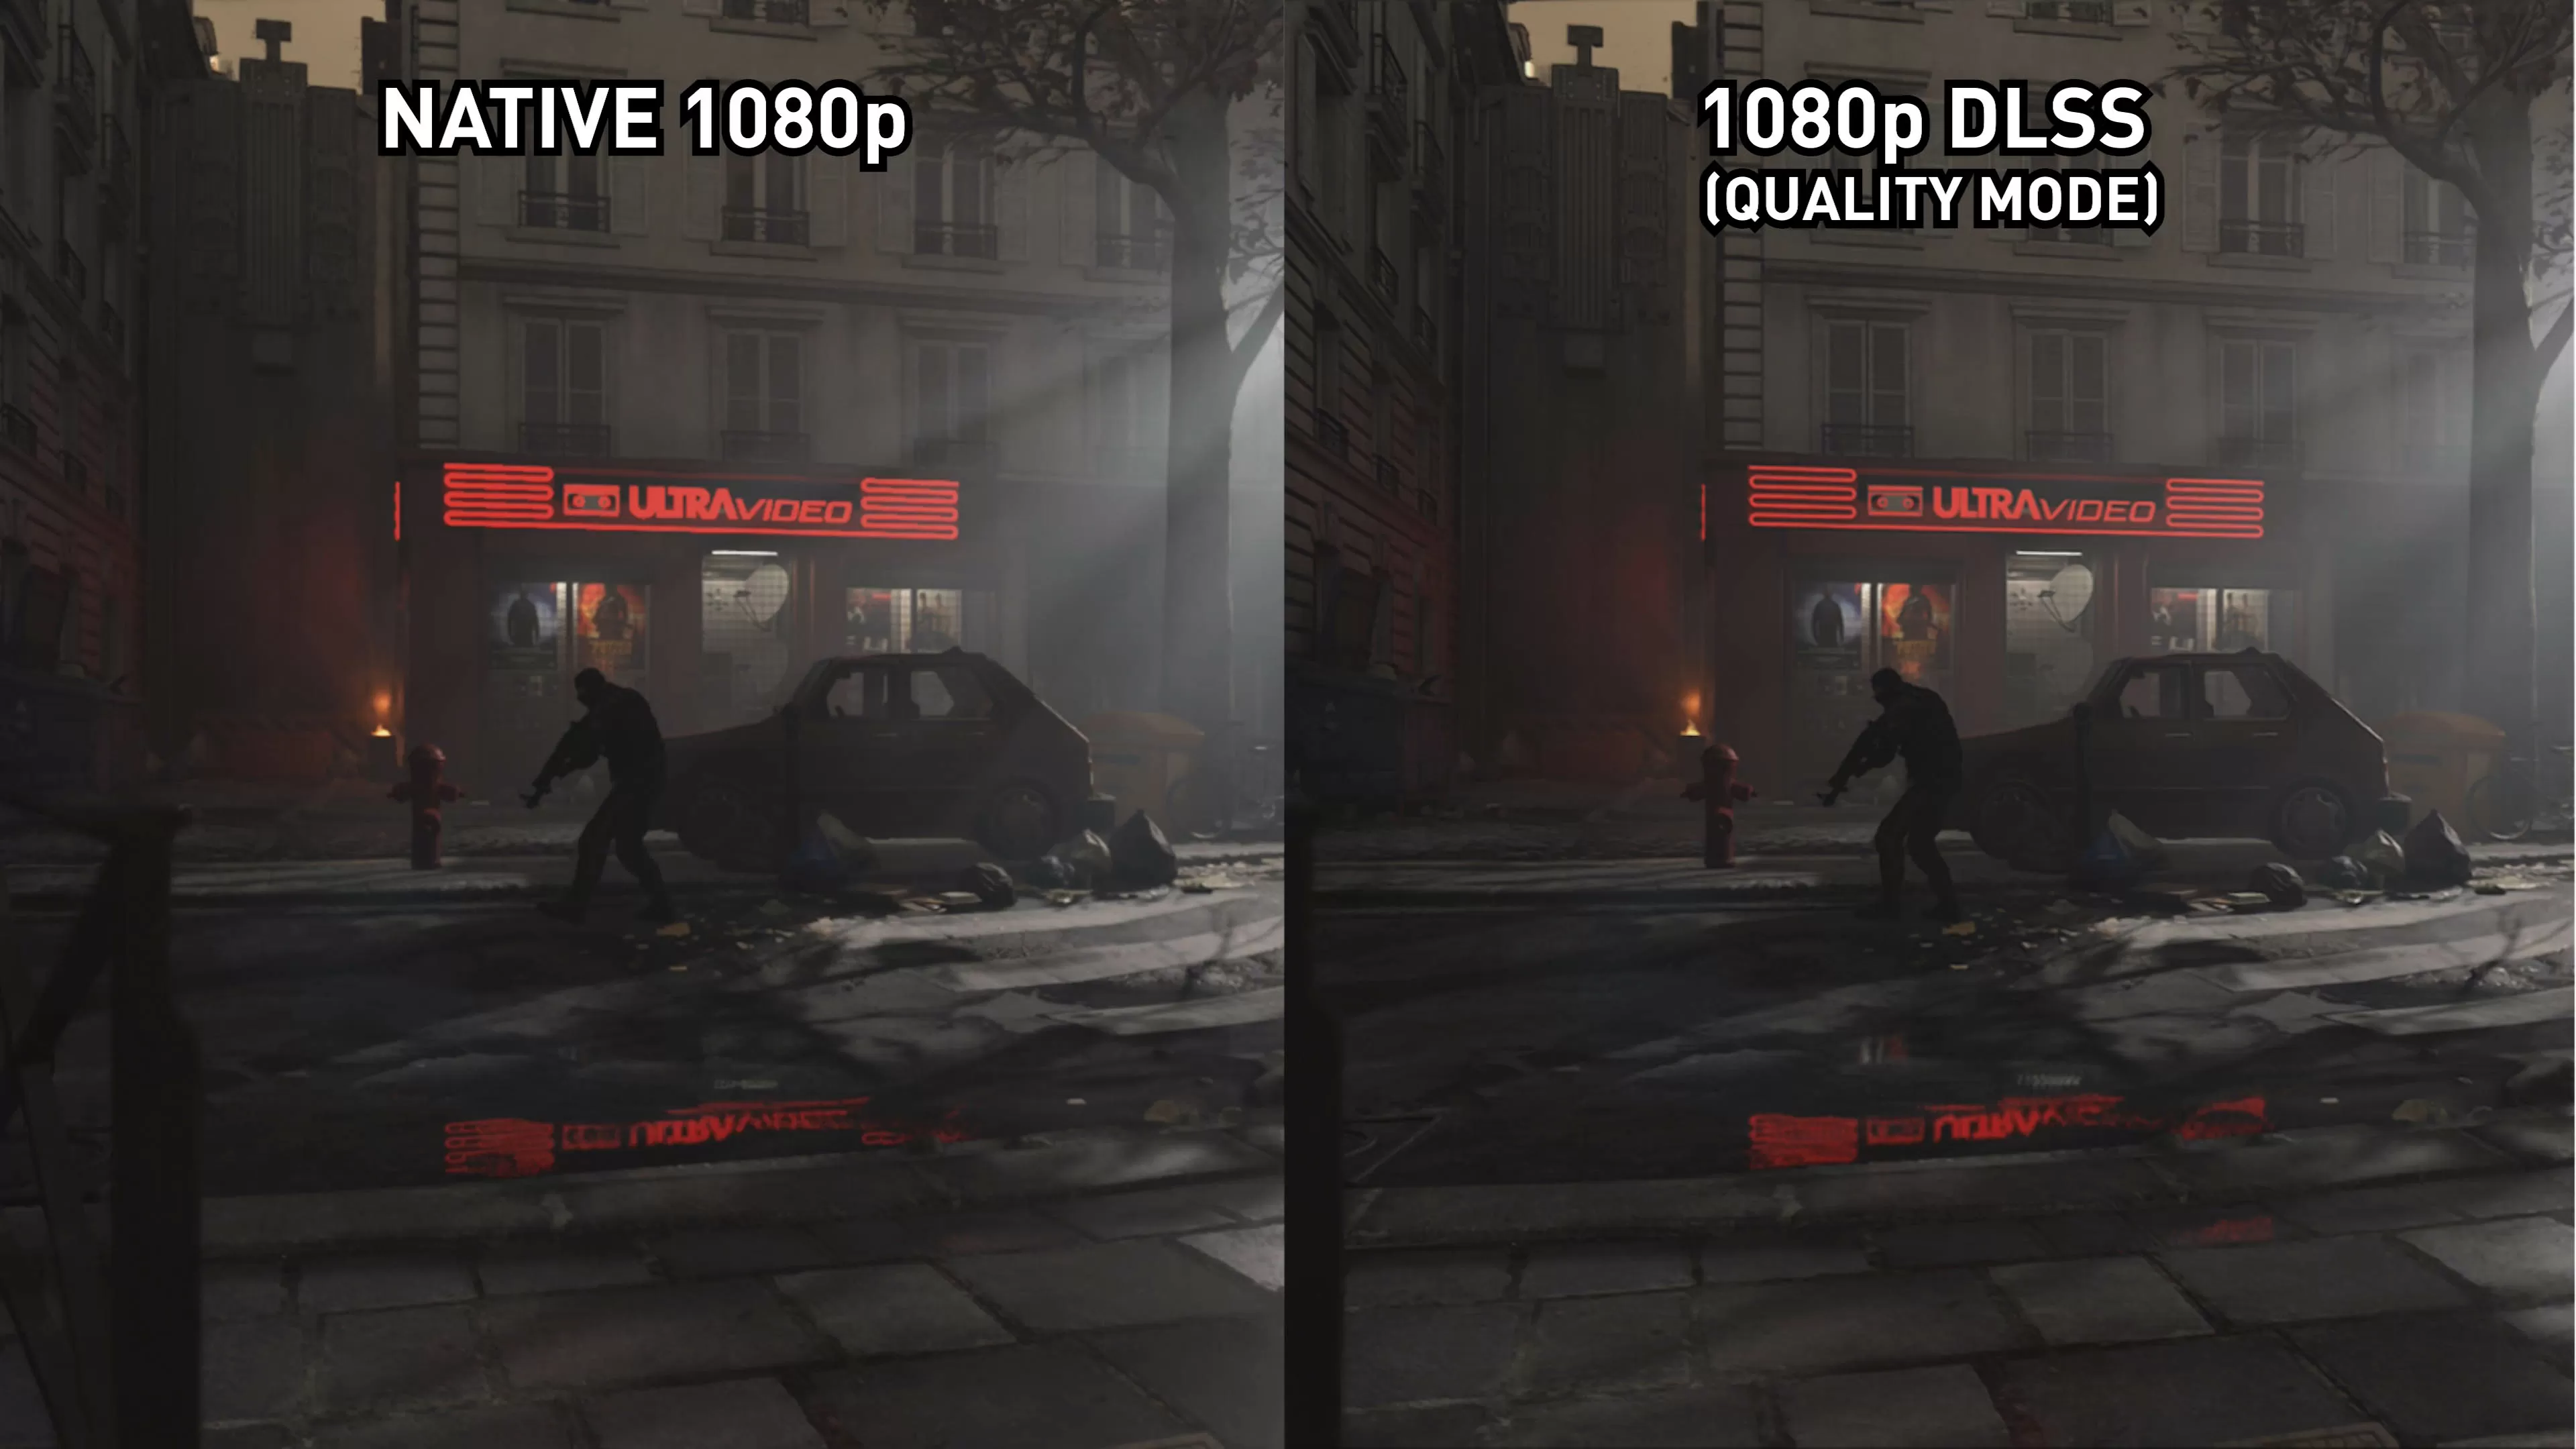
While DLSS’ primary benefit is a performance one (for example, render at 1080p but use the neural network to upscale it to 1440p), the system essentially applies AA because that’s the image that’s being targeted.
AMD is currently working on their own version of this and once released, we may see deep learning AA algorithms eventually replacing traditional ones — but not just yet. The systems are no easier to implement than, say, TAA and the visual results aren’t always perfect.
Research into improved anti-aliasing techniques continues, but we’ve come a long way since the days of the Riva TNT and Half-Life, where we just had to put up with jagged polygons all over the place, because we didn’t have the performance to do anything about it!
So the next time you’re configuring the graphics options of a new game, and see the various AA methods available to you, offer some silent thanks to the engineers and programmers who have figured all of this out and enjoy.
[ad_2]
Source link